A real engineer’s guide to deploy a Node.js app on Kubernetes, covering Dockerfiles, Deployments, Services, debugging crashes, and production best practices.
Why Kubernetes? And Why Is It So Confusing at First?
The first time I tried to deploy a Node.js app on Kubernetes, I spent three hours debugging why my pods kept crashing, only to discover I had a typo in my Docker image tag. Three. Hours.
That’s the thing about Kubernetes nobody prepares you for: the learning curve isn’t just about understanding the concepts. It’s about understanding the system’s failure modes. When something breaks, it doesn’t always shout at you. It whispers.
Kubernetes is genuinely worth learning. Once your app is running on it, you get:
- Self-healing containers, if a pod crashes, Kubernetes restarts it automatically
- Rolling updates with zero downtime
- Horizontal scaling with a single command
- A platform that scales from a side project to millions of users without rearchitecting everything
But if you’re deploying a Node.js app for the first time, the number of moving parts is overwhelming. Pods, Deployments, Services, Ingress, ConfigMaps, namespaces, it’s a lot. This guide cuts through that noise and gives you the most direct, practical path to getting your app live.
| ℹ️ NoteThis guide uses Minikube for local development, but every concept applies directly to EKS, GKE, AKS, or any managed Kubernetes cluster. The YAML files are identical. |
Prerequisites to deploy a node.js app on kubernetes
Before we write a single line of YAML, make sure you have these installed and working:
- Docker: Docker, to build and push container images
- kubectl: kubectl, the CLI to talk to Kubernetes clusters
- Minikube: Minikube, a single-node K8s cluster on your machine (or use Docker Desktop with K8s enabled)
- Node.js 20+: Node.js 20+ for the app itself
- Docker Hub account: A Docker Hub account to host your image (free tier works fine)
Verify your tools are ready:
Start your Minikube cluster:
minikube start --driver=docker --memory=4096 --cpus=2| 💡 Pro TipGive Minikube at least 4GB RAM. Running it with defaults (2GB) causes pods to get evicted silently when memory runs out, one of those surprises you only find 30 minutes later. |
Step 1: Create a Simple Node.js App
We’re keeping the app intentionally simple. The point is to understand Kubernetes, not Express routing.
const express = require('express');
const app = express();
const PORT = process.env.PORT || 3000;

app.get('/', (req, res) => {
  res.json({
    message: 'Hello from Kubernetes!',
    hostname: require('os').hostname(),
    version: process.env.APP_VERSION || '1.0.0'
  });
});
app.get('/health', (req, res) => {
  res.status(200).json({ status: 'ok' });
});

app.listen(PORT, () => {
  console.log(`Server running on port ${PORT}`);
});
Notice two things I did deliberately:
- Hostname endpoint: The hostname endpoint: When you scale to multiple pods, each pod will return a different hostname, proving load balancing is actually working.
- /health route: The /health route: Kubernetes will use this for liveness and readiness probes, something we’ll wire up in Step 4.
{
  "name": "k8s-node-app",
  "version": "1.0.0",
  "main": "app.js",
  "scripts": { "start": "node app.js" },
  "dependencies": { "express": "^4.18.2" }
}
Run npm install and test locally with node app.js. Hit localhost:3000. If it returns JSON, you’re good to move on.
Step 2: Write a Production-Ready Dockerfile
Most Dockerfile tutorials give you a five-liner that works but is bad for production. Here’s one that actually reflects how you’d do it in a real environment:
# Stage 1: Install dependencies
FROM node:20-alpine AS deps
WORKDIR /app
COPY package*.json ./
RUN npm ci --only=production

# Stage 2: Production image
FROM node:20-alpine AS runner
WORKDIR /app

# Create a non-root user for security
RUN addgroup -S appgroup && adduser -S appuser -G appgroup

COPY --from=deps /app/node_modules ./node_modules
COPY . .

# Drop root privileges
USER appuser

EXPOSE 3000
CMD ["node", "app.js"]
Why each decision matters:
- Multi-stage build: Multi-stage build: The deps stage installs packages. The runner stage only copies what it needs, no npm, no caches, no build tools in the final image.
- Alpine base: Alpine base: node:20-alpine is ~50MB vs ~300MB for the Debian-based image. Faster pulls, smaller storage cost in your registry.
- npm ci: npm ci not npm install: ci uses your lockfile exactly, giving you reproducible builds. No surprise package version jumps.
- Non-root user: Non-root user: If someone exploits your app, they get a low-privilege user, not root.
| ⚠️ ImportantAdd a .dockerignore file or you will accidentally copy node_modules, .git, and local env files into your image.Contents: node_modules | .git | *.env | .DS_Store |
Step 3: Build and Push the Docker Image
Replace yourdockerhubuser with your actual Docker Hub username.
# Build the image
docker build -t yourdockerhubuser/k8s-node-app:1.0.0 .

# Log into Docker Hub
docker login

# Push the image
docker push yourdockerhubuser/k8s-node-app:1.0.0

# Verify it is accessible
docker pull yourdockerhubuser/k8s-node-app:1.0.0
| # Build the imagedocker build -t yourdockerhubuser/k8s-node-app:1.0.0 . # Log into Docker Hubdocker login # Push the imagedocker push yourdockerhubuser/k8s-node-app:1.0.0 # Verify it is accessibledocker pull yourdockerhubuser/k8s-node-app:1.0.0 |
| 💡 Pro TipAlways use specific image tags, never :latest in production YAML. With :latest, Kubernetes may cache an old version and you will have no idea which version is running when debugging at 2am. |
Step 4: Create Your Kubernetes Deployment YAML
This is where things get real. The Deployment is the brain of your app in Kubernetes, it tells the cluster what to run, how many copies to maintain, and how to handle restarts.
apiVersion: apps/v1
kind: Deployment
metadata:
name: node-app
labels:
app: node-app
spec:
replicas: 2
selector:
matchLabels:
app: node-app
strategy:
type: RollingUpdate
rollingUpdate:
maxSurge: 1
maxUnavailable: 0
template:
metadata:
labels:
app: node-app
spec:
containers:
- name: node-app
image: yourdockerhubuser/k8s-node-app:1.0.0
ports:
- containerPort: 3000
env:
- name: PORT
value: "3000"
resources:
requests:
cpu: "100m"
memory: "128Mi"
limits:
cpu: "250m"
memory: "256Mi"
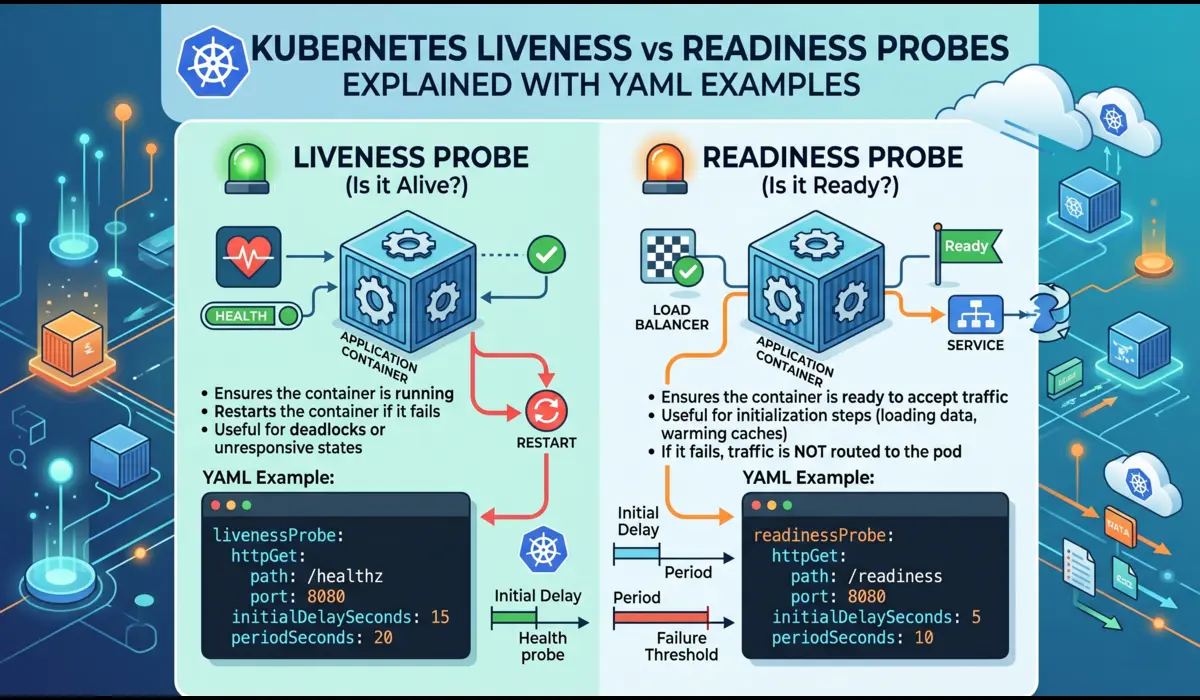
livenessProbe:
httpGet:
path: /health
port: 3000
initialDelaySeconds: 15
periodSeconds: 20
readinessProbe:
httpGet:
path: /health
port: 3000
initialDelaySeconds: 5
periodSeconds: 10
replicas: 2
Always run at least 2 replicas in production. With 1 replica, a pod restart means downtime. With 2, Kubernetes takes one pod down while the other serves traffic.
Resource Requests and Limits
Requests tell the scheduler how much CPU/memory to reserve. Limits cap the maximum a pod can consume. Without limits, one misbehaving pod can eat all the memory on a node and take everything else down with it. I’ve seen this happen in production. It’s not fun.
Liveness vs Readiness Probes
- Liveness: Liveness: Is this container still alive? If it fails repeatedly, Kubernetes restarts the pod.
- Readiness: Readiness: Is this container ready to receive traffic? If it fails, the pod is removed from the load balancer but NOT restarted.
The initialDelaySeconds on the liveness probe is critical, give your app time to start before Kubernetes begins checking. Too short and your pod restarts in a loop before it even finishes booting.
RollingUpdate Strategy
maxUnavailable: 0 means Kubernetes will never take a pod down before a new one is ready. Zero-downtime deployments by default.
Step 5: Expose the App Using a Service
A Kubernetes Service is how other things connect to your pods. Without it, pods are essentially invisible, even to each other.
apiVersion: v1
kind: Service
metadata:
  name: node-app-service
spec:
  selector:
    app: node-app
  ports:
    - protocol: TCP
      port: 80
      targetPort: 3000
  type: NodePort
ClusterIP vs NodePort vs LoadBalancer
- ClusterIP: ClusterIP (default): Exposes the service only within the cluster. Use when the service is called by other internal services.
- NodePort: NodePort: Opens a port on every node (30000–32767 range). Good for local testing and Minikube.
- LoadBalancer: LoadBalancer: Provisions a cloud load balancer (AWS ELB, GCP LB, etc.). The real production option on managed clusters.
Step 6: Apply Everything and Access Your App
# Apply both files
kubectl apply -f deployment.yaml
kubectl apply -f service.yaml

# Watch pods come up
kubectl get pods -w

# Check the service
kubectl get services

# With Minikube, get the accessible URL
minikube service node-app-service --url
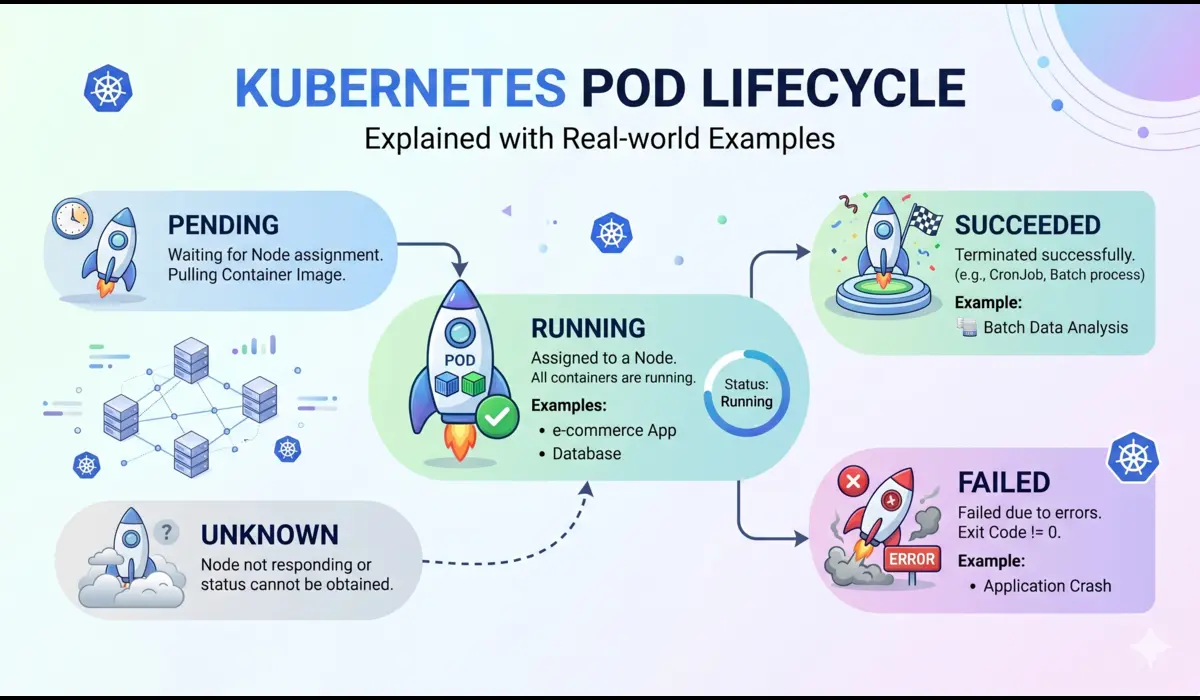
Watch both pods move from Pending → ContainerCreating → Running. If they stay in any other state, jump to Step 7.
Open the Minikube URL in your browser. Hit refresh a few times and notice the hostname changing. That’s Kubernetes load balancing between your two pods.
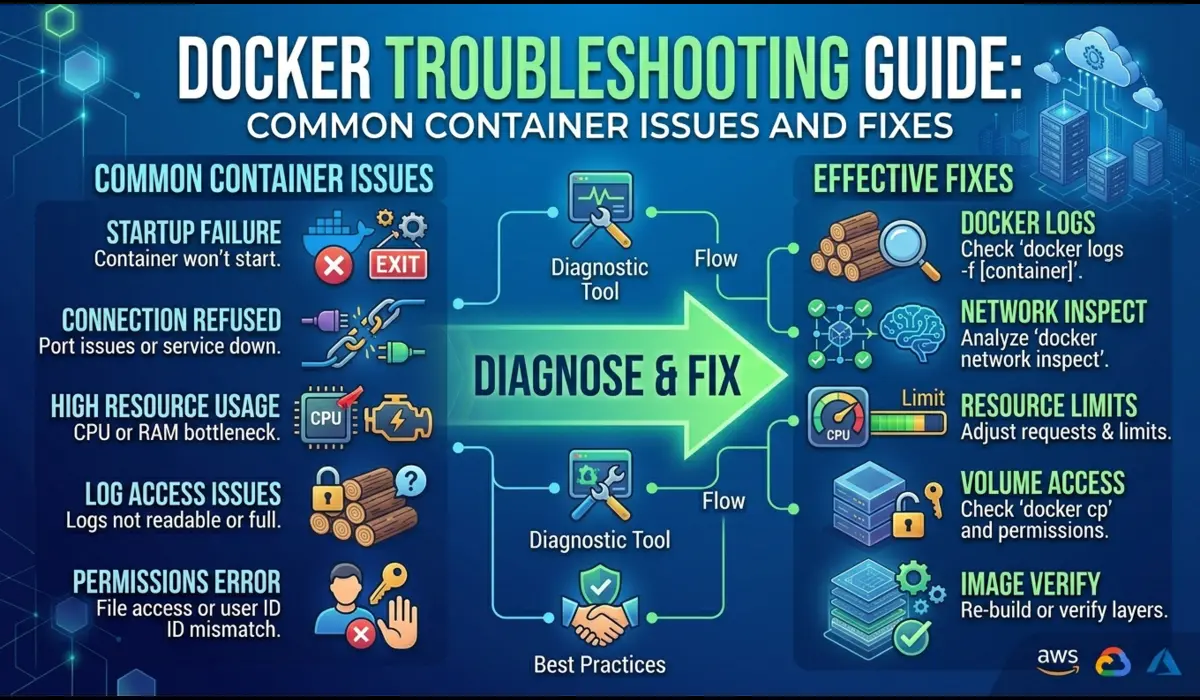
Step 7: Debugging Common Issues
This section is the most valuable part of the article, because this is where most tutorials abandon you. Here are the three most common failures and exactly how to diagnose them.
| CrashLoopBackOff: Your pod starts, crashes, Kubernetes restarts it, it crashes again. The pod status cycles between Error and CrashLoopBackOff.What it usually means: Your app is throwing an error on startup, wrong environment variable, missing file, port binding issue, or an unhandled exception.How to Diagnose:# Get pod name firstkubectl get pods # Check the logs, even for a crashed podkubectl logs <pod-name> # If the pod restarted, check previous container logskubectl logs <pod-name> –previous # Get full pod details including eventskubectl describe pod <pod-name> |
The kubectl describe output has an Events section at the bottom. That is usually where the real error lives.
| ImagePullBackOff / ErrImagePullKubernetes can’t pull your Docker image. Your pod stays in a Pending-ish state and never runs.Most common causes: Typo in image name/tag, private registry without an imagePullSecret, or the image doesn’t exist on Docker Hub yet.How to Diagnose:kubectl describe pod <pod-name># Look at the Events section, it will say something like:# Failed to pull image ‘yourname/app:1.0.0’:# Error: manifest unknown |
Double-check your image tag exactly matches what you pushed. Case-sensitive. No spaces.
| Service Not Accessible / Connection RefusedYour pods are running but hitting the service URL returns nothing or a connection error.Most common causes: The selector in your Service YAML doesn’t match pod labels, wrong targetPort, or readiness probe is failing.How to Diagnose:# Check if the service has any endpointskubectl get endpoints node-app-service # If ENDPOINTS shows <none>, your selector is broken# Compare pod labels with your service selector:kubectl get pods –show-labels # Exec into a pod to test from inside the clusterkubectl exec -it <pod-name> — /bin/sh# Then inside the pod:curl localhost:3000/health |
| 💡 Pro Debugging MoveIf curl localhost:3000/health works inside the pod but the Service is still unreachable, your issue is in the Service config, specifically the selector or targetPort, not the app itself. |
Step 8: Scaling and Updating the App
This is where Kubernetes starts to feel genuinely powerful.
Scale Up
# Scale to 5 replicas
kubectl scale deployment node-app --replicas=5

# Watch pods spin up in real time
kubectl get pods -w
Within seconds you have 5 pods serving traffic. Scale back down just as easily.
Rolling Update means Zero Downtime
# Build and push new version
docker build -t yourdockerhubuser/k8s-node-app:1.1.0 .
docker push yourdockerhubuser/k8s-node-app:1.1.0

# Update the deployment
kubectl set image deployment/node-app node-app=yourdockerhubuser/k8s-node-app:1.1.0

# Watch the rolling update
kubectl rollout status deployment/node-app
Because we set maxUnavailable: 0, Kubernetes brings up the new pod first, verifies it passes readiness checks, then terminates the old one. Your users never see a dropped request.
Rollback if Something Goes Wrong
# Immediate rollback to previous version
kubectl rollout undo deployment/node-app

# Or roll back to a specific revision
kubectl rollout history deployment/node-app
kubectl rollout undo deployment/node-app --to-revision=2
Step 9: Ingress Setup (Optional but Recommended)
NodePort gets you up and running, but in real production you want an Ingress. It acts like a reverse proxy, routing HTTP/HTTPS traffic to different services based on hostname or URL path, using a single external IP.
minikube addons enable ingressapiVersion: networking.k8s.io/v1
kind: Ingress
metadata:
name: node-app-ingress
annotations:
nginx.ingress.kubernetes.io/rewrite-target: /
spec:
rules:
- host: node-app.local
http:
paths:
- path: /
pathType: Prefix
backend:
service:
name: node-app-service
port:
number: 80
kubectl apply -f ingress.yaml

# Add to /etc/hosts (replace with your minikube ip output)
$(minikube ip)   node-app.local
In production on EKS or GKE, the Ingress Controller provisions a real load balancer and handles TLS termination via cert-manager. The YAML structure is nearly identical.
Real Mistakes to Avoid
Things I’ve either done myself or watched teammates do under pressure:
| 01 | Using :latest as your image tag in YAMLKubernetes may cache the old ‘latest’ image on a node. When you push a new version, some pods might keep running the old one. Use explicit semantic versions like :1.2.0 or a Git commit SHA. |
| 02 | No resource limits on containersWithout limits, one misbehaving pod can OOM-kill its entire node, taking down every other pod on it. Always set both requests and limits. |
| 03 | Setting initialDelaySeconds too low on liveness probesIf your app takes 10 seconds to start and your liveness probe fires after 5, Kubernetes kills the pod before it finishes booting. Infinite restart loop. |
| 04 | Running as root inside the containerMost Node.js Docker tutorials skip this. Always create a non-root user in your Dockerfile and switch to it before running your app. |
| 05 | Hardcoding secrets in YAML or environment variablesYour YAML files will end up in Git. Use Kubernetes Secrets or an external secret manager (like AWS Secrets Manager with ESO) to keep sensitive values out of your codebase. |
| 06 | Deploying with only 1 replicaEvery pod restart is a moment of downtime with one replica. Default to 2+ in staging and production. The cost is trivial; the reliability improvement is not. |
If I Had to Do This Again, The Better Approach
Looking back at everything I’ve learned deploying on Kubernetes, here’s what I would do differently from the start:
- Use Helm from day one.: Use Helm from day one. Managing raw YAML files works for one app. By the third app you’ll have duplicated boilerplate everywhere. Helm charts let you template your deployments and manage them like proper packages.
- Set up CI/CD before anything else.: Set up a proper CI/CD pipeline before anything else. Manually running kubectl apply works locally but doesn’t scale. Wire up GitHub Actions or GitLab CI to build, tag, push, and deploy automatically on every merge to main.
- Invest in observability early.: Spend time on observability early. Install Prometheus and Grafana on day one. Flying blind with no metrics makes debugging incidents 10x harder. The Kubernetes community has excellent ready-made dashboards.
- Learn namespaces before you need them.: Learn namespaces before you need them. Separating dev, staging, and production workloads into different namespaces prevents accidental cross-environment interference.
Conclusion
| Task to Deploy a Node.js app on Kubernetes from scratch isn’t quick, but once you’ve done it end-to-end, the mechanics click into place. Pods are just your containers. Deployments are how you manage them at scale. Services are how you expose them. Ingress is how the internet reaches them. The real value of Kubernetes isn’t just running your app. It’s zero-downtime deploys, automatic restarts, horizontal scaling under load, and a consistent deployment model across dev, staging, and prod.Start small with Minikube. Get comfortable with kubectl describe, kubectl logs, and kubectl get endpoints, they’re your best friends in this ecosystem. |
Pratik Shinde
Pratik Shinde is a DevOps and Cloud professional based in Pune, Maharashtra, India, with hands-on experience in building and managing scalable systems. Working in top multinational Organization as Devops Engineer with experience of 10+ years. He has a strong working background in DevOps, Kubernetes, and cloud platforms, along with practical exposure to artificial intelligence and machine learning concepts. He also shares knowledge and learning resources on platforms like LinkedIn and other social channels, aiming to simplify complex topics and make them accessible to a wider audience. Linkedin URL: https://www.linkedin.com/in/pratikshinde8494/ . Github URL: https://github.com/PratikShindeGithub